In this blog, I will discuss How to Create Class Components in React.

What is a Class Component?
In React, class components are a traditional way of creating components using ES6 classes. However, with the introduction of React Hooks, functional components have become more popular. Still, it’s essential to know how to create class components, especially if you are working with older codebases or libraries that rely on class-based components.
Basc Example Demonstrating How to Create Class Components in React
ChangePet.js
import React, { Component } from 'react';

class MyComponent extends Component {
  constructor(props) {
    super(props);

    // Initialize state if needed
    this.state = {
      // Your state properties go here
    };
  }

  // You can also define lifecycle methods like componentDidMount, componentDidUpdate, etc.

  render() {
    return (
      <div>
        <h1>Hello, I'm a class component!</h1>
        {/* You can use this.state and this.props to access state and props */}
      </div>
    );
  }
}

export default MyComponent;
In this example:
- We import React and the
Componentclass from the ‘react’ module. - We create a class named
MyComponentthat extendsComponent. - Inside the class, we can use the
constructormethod to initialize state and bind methods if needed. - The
rendermethod returns the JSX that represents the component’s UI.
Remember that class components have their own lifecycle methods, such as componentDidMount, componentDidUpdate, and componentWillUnmount. These methods can be used for handling side effects, data fetching, and cleaning up resources.
Another Example
import React, {Component} from 'react';
class ChangePet extends React.Component{
constructor(props){
super(props);
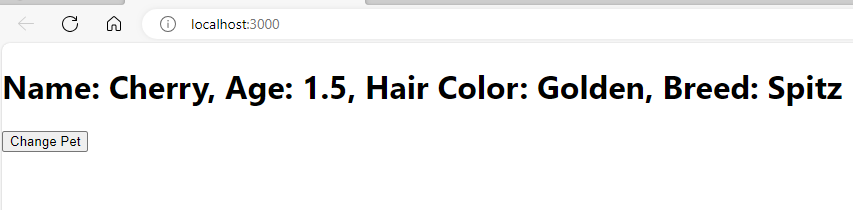
this.state = {flag: 0, name: 'Cherry', age: 1.5, hair: 'Golden', breed: 'Spitz' };
}
v=()=>this.setState( (prevState) => ({
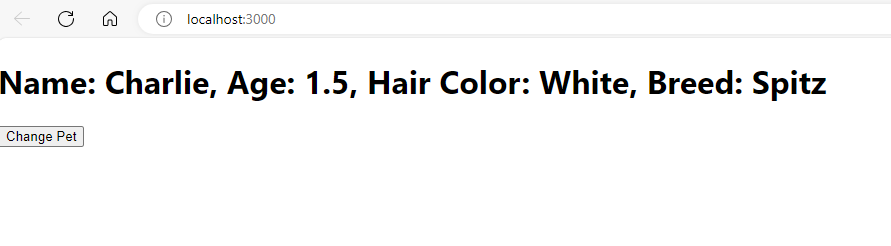
name: prevState.flag===0?'Charlie':'Cherry',
hair: prevState.flag===0?'White':'Golden',
flag: prevState.flag===0?1:0}));
render(){
return(
<div>
<h1>Name: {this.state.name}, Age: {this.state.age}, Hair Color: {this.state.hair}, Breed: {this.state.breed}
</h1>
<button onClick = {this.v}>Change Pet</button>
</div>
);
}
}
export default ChangePet;App.js
// App.js

import React from 'react';
import ChangePet from './ChangePet';
function App() {
  return (
    <div className="App">
     <ChangePet />
    </div>
  );
}

export default App;
Output
This code defines a React class component named ChangePet. Let’s break down its structure and functionality:
Import Statements
import React, { Component } from 'react';
This line imports the React object and the Component class from the ‘react’ module. The Component class is used as the base class for the ChangePet component.
Class Definition
class ChangePet extends React.Component {
This line declares a class named ChangePet that extends the React.Component class. This class will represent a React component.
Constructor
constructor(props) {
  super(props);
  this.state = {
    flag: 0,
    name: 'Cherry',
    age: 1.5,
    hair: 'Golden',
    breed: 'Spitz',
  };
}
In the constructor, the initial state of the component is defined. The state includes properties such as flag, name, age, hair, and breed. The initial values are set accordingly.
v Method
v = () => this.setState((prevState) => ({
  name: prevState.flag === 0 ? 'Charlie' : 'Cherry',
  hair: prevState.flag === 0 ? 'White' : 'Golden',
  flag: prevState.flag === 0 ? 1 : 0,
}));
This method (v) is an arrow function that updates the component’s state using setState. It toggles the values of name, hair, and flag based on the current value of flag.
Render Method
render() {
  return (
    <div>
      <h1>
        Name: {this.state.name}, Age: {this.state.age}, Hair Color: {this.state.hair}, Breed: {this.state.breed}
      </h1>
      <button onClick={this.v}>Change Pet</button>
    </div>
  );
}
The render method returns JSX, defining the structure of the component’s UI. It displays the current values of name, age, hair, and breed from the component’s state. A button is rendered that, when clicked, triggers the v method to update the state and change the displayed values.
Export Statement
export default ChangePet;
Finally, the ChangePet component is exported as the default export of this module, making it available for use in other parts of your application.
In summary, this component represents a pet with various attributes, and clicking the “Change Pet” button toggles between two sets of values for the pet’s name, hair color, and a flag indicating the change.
It’s worth noting that React Hooks provide a more concise and functional way of handling state and side effects in functional components. If you’re starting a new project or updating an existing one, consider using functional components with hooks.
For more information on Functional Components, click here.
https://www.programmingempire.com/how-to-create-function-components-in-react/
Further Reading
Examples of Array Functions in PHP
Exploring PHP Arrays: Tips and Tricks
Registration Form Using PDO in PHP
Inserting Information from Multiple CheckBox Selection in a Database Table in PHP
PHP Projects for Undergraduate Students
Architectural Constraints of REST API
Creating a Classified Ads Application in PHP
How to Create a Bar Chart in ReactJS?
- Angular
- ASP.NET
- C
- C#
- C++
- CSS
- Dot Net Framework
- HTML
- IoT
- Java
- JavaScript
- Kotlin
- PHP
- Power Bi
- Python
- Scratch 3.0
- TypeScript
- VB.NET