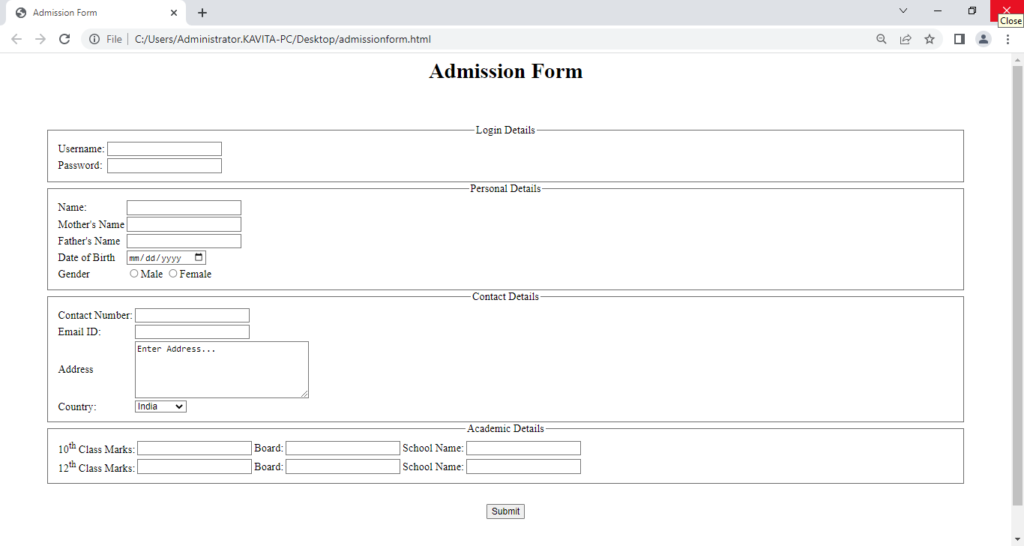
This article describes how to create an Admission Form in HTML.
The following code shows the example of an HTML Form that we can use for Admission for a course. Basically, an HTML form allows user to provide their input to a website. In other words, an HTML form displays various input controls so that the user can enter some values. Also, it contains a submit button. When user clicks on the submit button, the form is sent to the server for processing.
The following example displays the <form tag. Since, it is a basic example of using the form tag, here we have used just one attribute called method. Basically, the value POST indicates that the form will use the POST method to securely send form data to the server. Another method is the GET method. Apart rom the method attribute, the <form> tag also has a name attribute that identifies the form and the action attribute represents the file that will be processed when user submits the form.
Furthermore, the form element encloses the input elements that specifies certain kind of input control. For instance, we can use the textbox, checkboxes, radio buttons, drop down lists and so on. the input tag has an attribute called type. Some of the possible values of the type attribute are text, checkbox, radio, file, date, number, and email. In order to display a drop-down list, we use the select tag. The option tag within the select tag represents the list items.
Also, note the use of the <fieldset> and <legend> tag. Basically, the fieldset tag groups the controls of the form. Whereas, the legend provides a title to the group.
The Complete Code for Admission Form in HTML
<html>
  <head>
     <title>Admission Form</title>
  </head>
  <body>
     <center><h1>Admission Form</h1></center>
     <div style="margin: 50px;padding: 10px; text-align: center;">
     <form method="POST">
       <fieldset>
         <legend>Login Details</legend>
         <table>
             <tr>
                <td>Username: </td>
                <td><input type="text" name="t1"/></td>
             </tr>
             <tr>
                <td>Password: </td>
                <td><input type="password" name="t2"/></td>
             </tr>
         </table>
       </fieldset>
       <fieldset>
         <legend>Personal Details</legend>
         <table>
            <tr>
		<td>Name: </td>
		<td><input type="text" name="t3"/></td>
            </tr>
            <tr>
		<td>Mother's Name</td>
		<td><input type="text" name="t4"/></td>
	    </tr>
            <tr>
		<td>Father's Name</td>
		<td><input type="text" name="t5"/></td>
	    </tr>
            <tr>
		<td>Date of Birth</td>
		<td><input type="date" name="t6"/></td>
	    </tr>
            <tr>
		<td>Gender</td>
		<td>
		    <input type="radio" name="r1" value="male">Male</input>
		    <input type="radio" name="r1" vale="female">Female</input>
                </td>
	    </tr>
         </table>
       </fieldset>
        <fieldset>
         <legend>Contact Details</legend>
          <table>
            <tr>
		<td>Contact Number: </td>
		<td><input type="tel" name="t7"/></td>
            </tr>
            <tr>
		<td>Email ID: </td>
		<td><input type="email" name="t8"/></td>
            </tr>
            <tr>
		<td>Address</td>
		<td><textarea rows="5" cols="30">Enter Address...</textarea></td>
            </tr>
            <tr>
		<td>Country: </td>
		<td>
                   <select name="country">
			<option>India</option>
			<option>USA</option>
			<option>UK</option>
			<option>Australia</option>
                   </select>
                </td>
            </tr>
          </table>

       </fieldset>
       <fieldset>
         <legend>Academic Details</legend>
         <table>
           <tr>
             <td>10<sup>th</sup> Class Marks:</td>
             <td><input type="number" name="t9"/></td>
             <td>Board: </td>
             <td><input type="text" name="t9_1"/></td>
             <td>School Name: </td>
             <td><input type="text" name="t9_2"/></td>
           </tr>
           <tr>
           <tr>
             <td>12<sup>th</sup> Class Marks:</td>
             <td><input type="number" name="t10"/></td>
             <td>Board: </td>
             <td><input type="text" name="t10_1"/></td>
             <td>School Name: </td>
             <td><input type="text" name="t10_2"/></td>
           </tr>
           </tr>
         </table>
       </fieldset>
       <div style="margin-top: 20px; padding: 10px;text-align: center;">
           <Button onclick="alert('Form Submitted');">Submit</button>
       </div>
     </form>
     </div>
  </body>
</html>
Output

Further Reading
Introduction to Django Framework and its Features
Examples of Array Functions in PHP
Registration Form Using PDO in PHP
Inserting Information from Multiple CheckBox Selection in a Database Table in PHP
- Angular
- ASP.NET
- C
- C#
- C++
- CSS
- Dot Net Framework
- HTML
- IoT
- Java
- JavaScript
- Kotlin
- PHP
- Power Bi
- Python
- Scratch 3.0
- TypeScript
- VB.NET
